1. Environment Preparation
1.1 Chrome Browser Installation
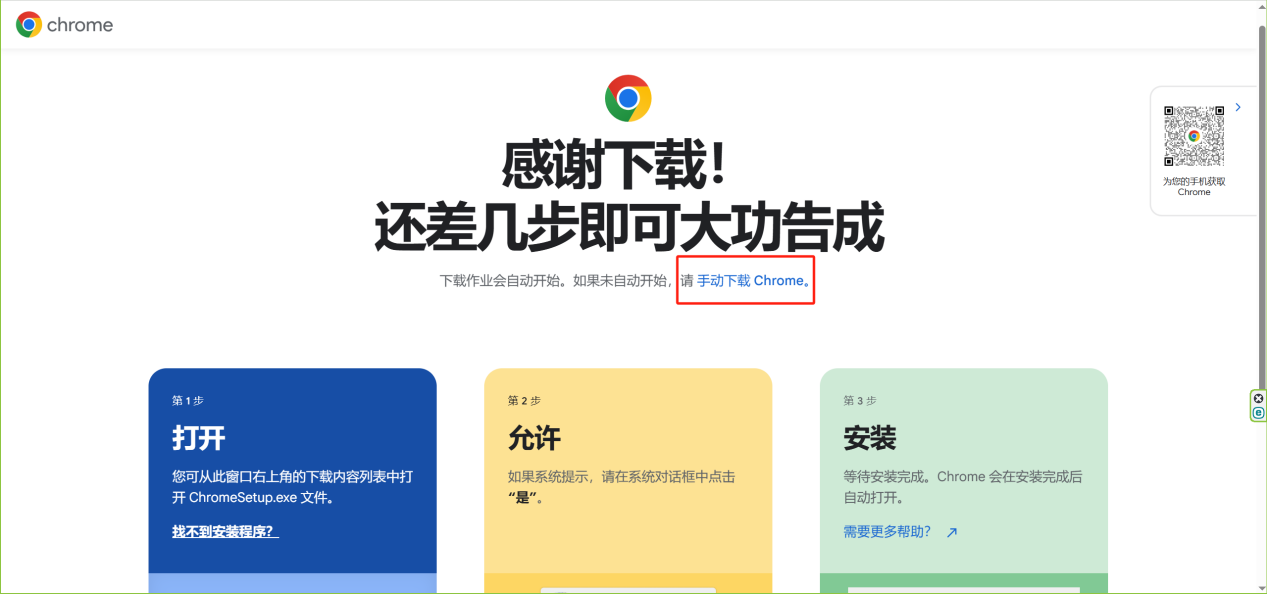
Please use the latest version of Chrome browser to access the system PC terminal
⬇️ Visit Chrome Download PageAfter opening the link, please click "Download Chrome Manually" button to install
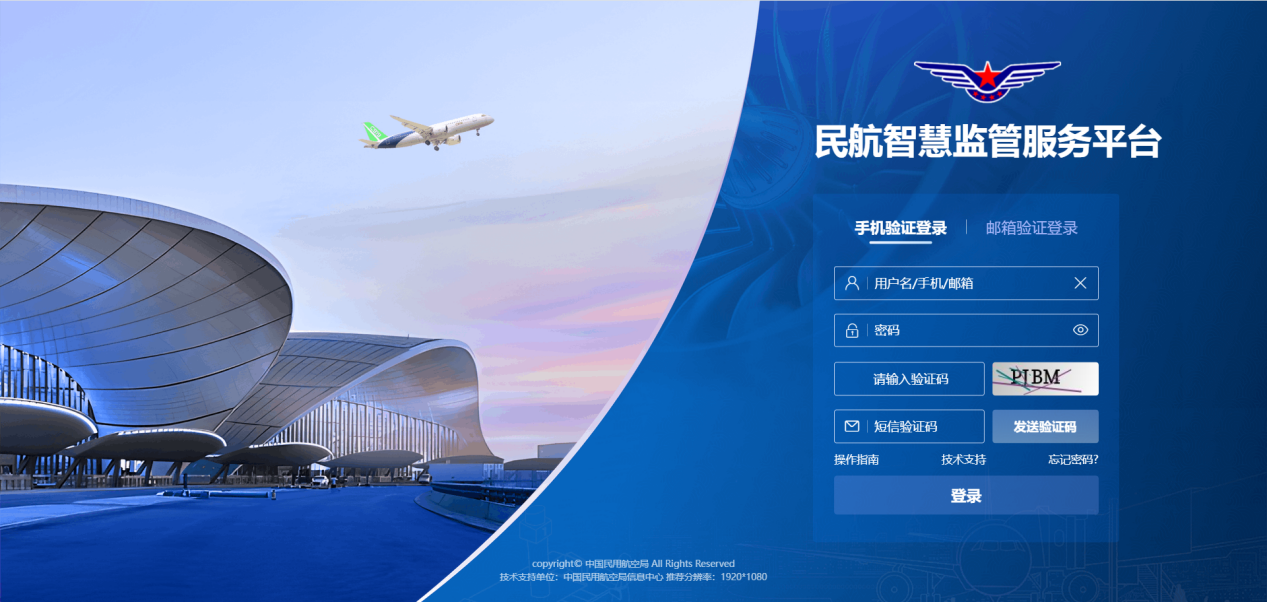
2. First Login and Password Setup
- For users who originally used FSOP, AMS, SES, or ASOP systems, when logging in for the first time, you need to click 【Forgot Password】 on the login page to set your password.
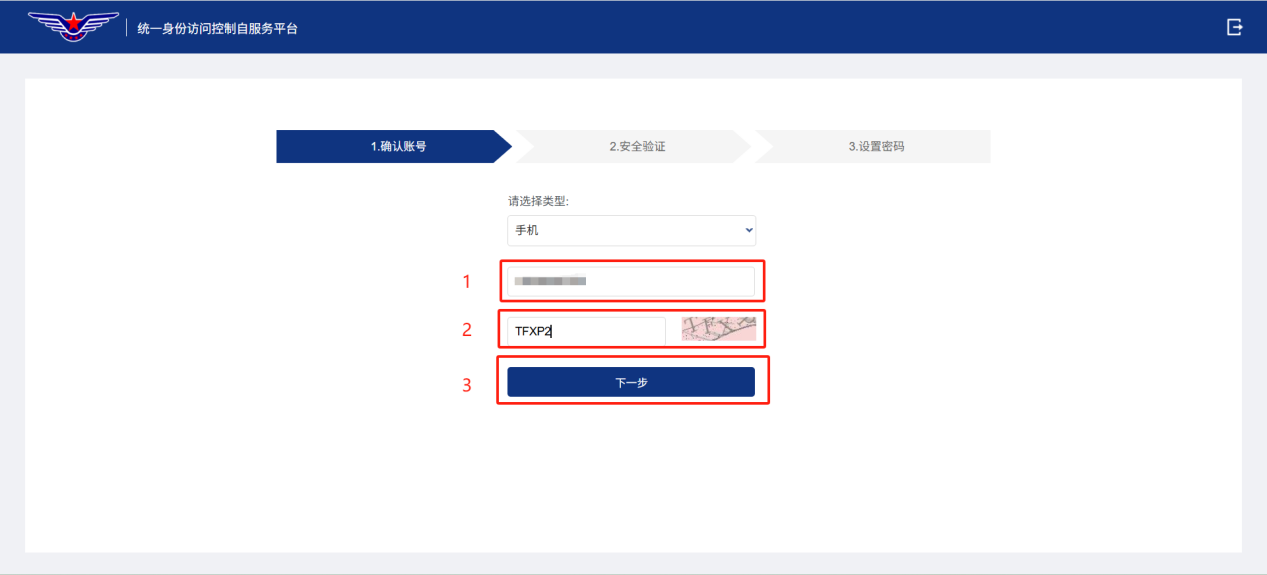
- Select verification method as "Mobile Phone"
- Enter your original system login phone number and graphic captcha
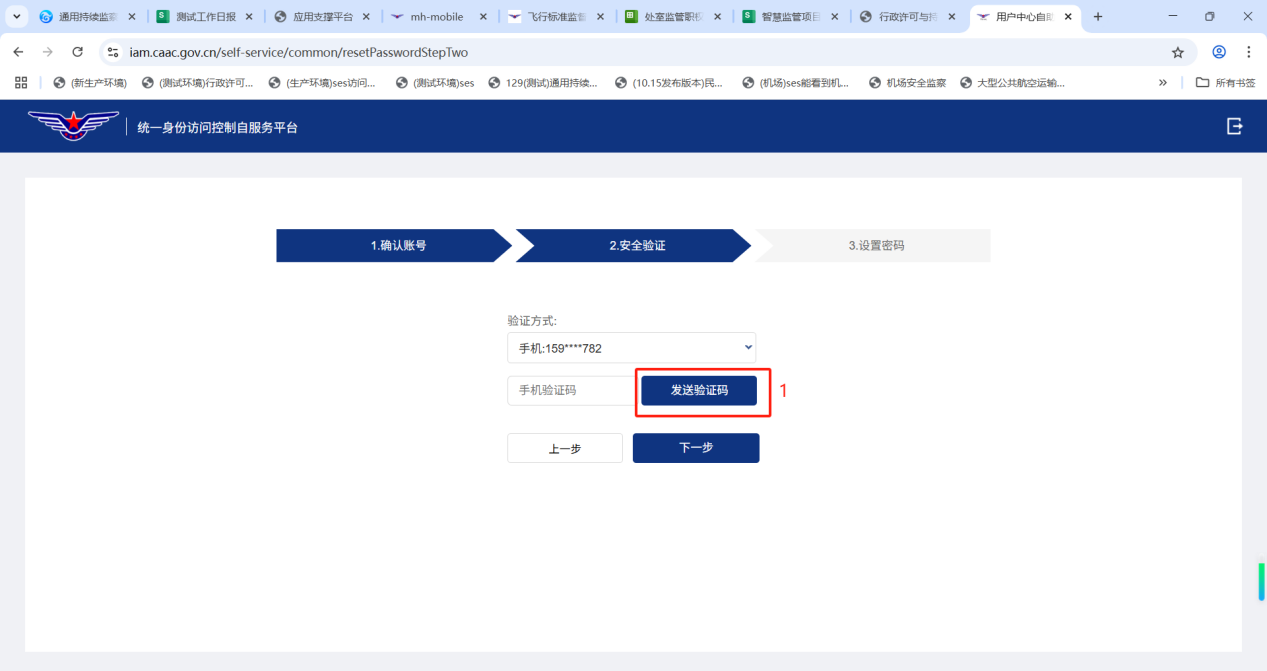
- Click 【Send Verification Code】 and enter the SMS verification code
- Click 【Next】, enter "New Password" and "Confirm New Password", then click 【Confirm】 to submit
- Set a new password (rules as follows)
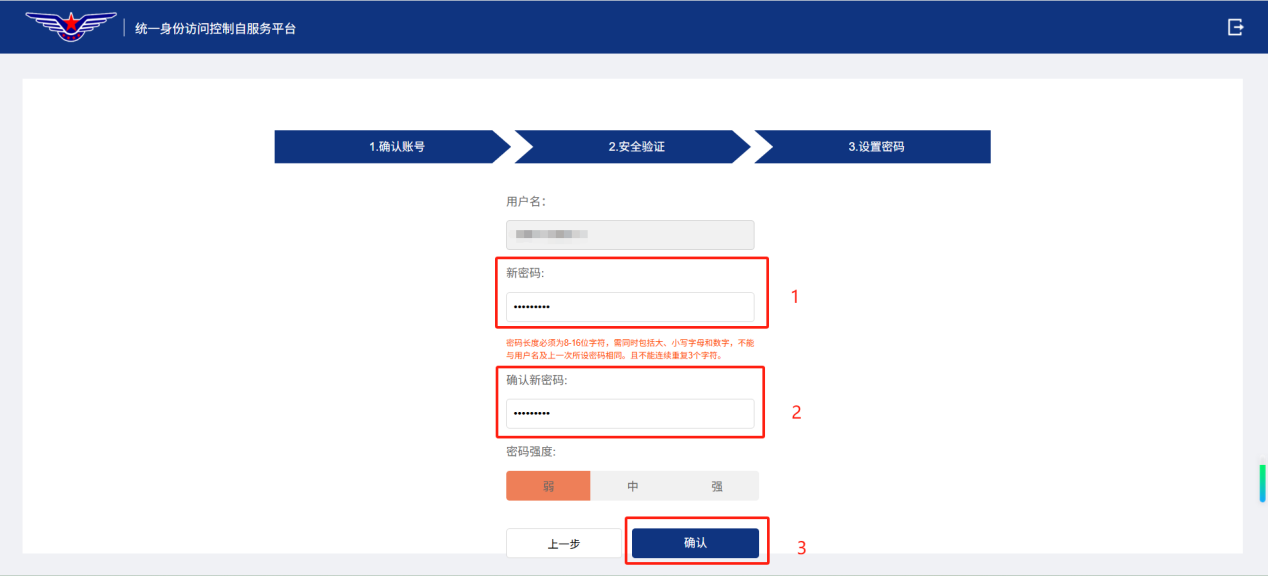
- 8-16 characters
- Must contain at least uppercase letters, lowercase letters, and numbers
- Cannot be the same as username or historical passwords
- No 3 consecutive repeated characters allowed
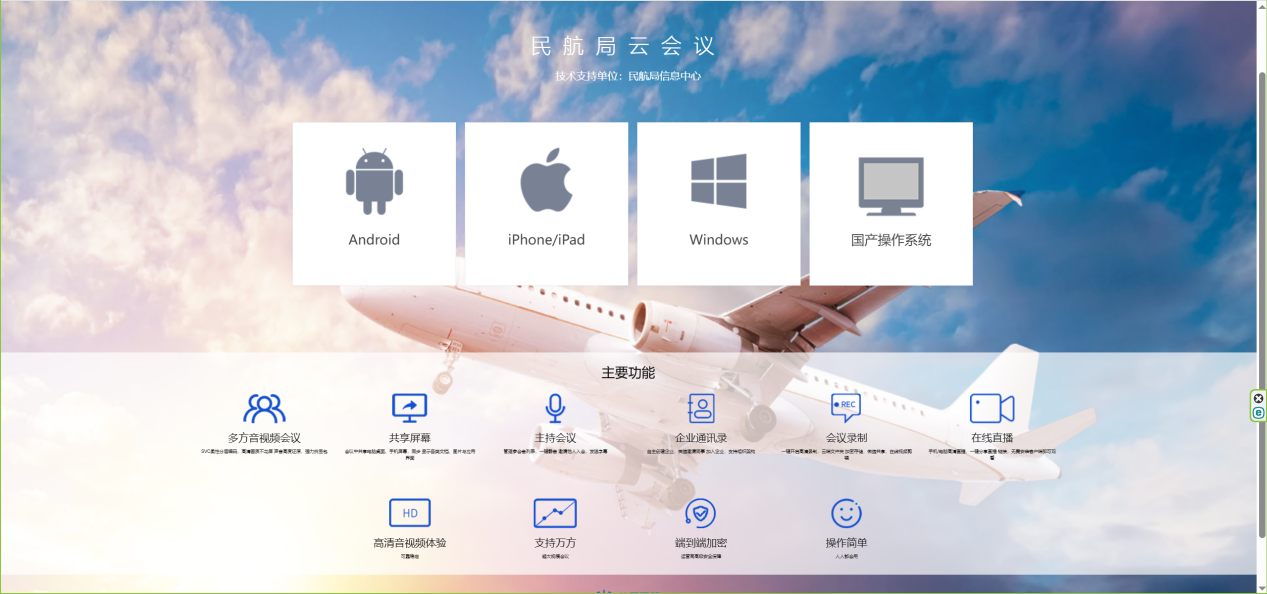
3. CAAC Cloud Meeting Client
Download Method 1: Official Website
🌐 Visit Cloud Meeting Download PageUsers who need to use the remote inspection function, please select the appropriate version based on your system environment, scroll down to select the client below
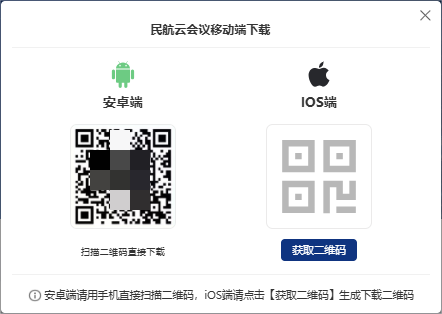
Note: iPhone/iPad version does not support external network download. See "Download Method 2" for details.
Download Method 2: Direct Download
Android Client

Scan to download Android version
iOS Client
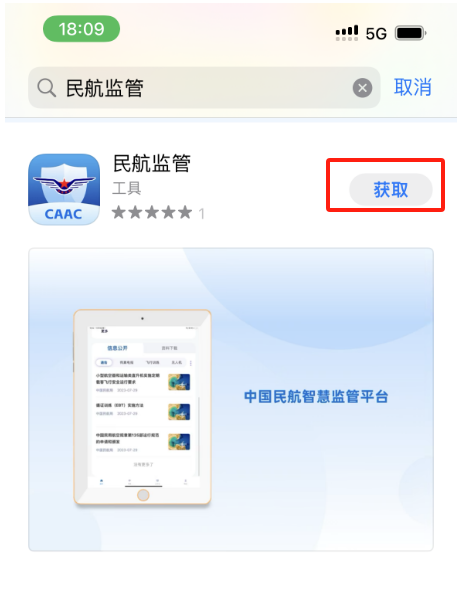
On your iPhone or iPad: Log in to the CAAC Work Portal's Smart Oversight Programs and tap the floating action button "![]() " to enter the download page, click to get QR code for download. Please note that the iOS QR code can only be used once, as shown below:
" to enter the download page, click to get QR code for download. Please note that the iOS QR code can only be used once, as shown below:
4. Mobile User Guide
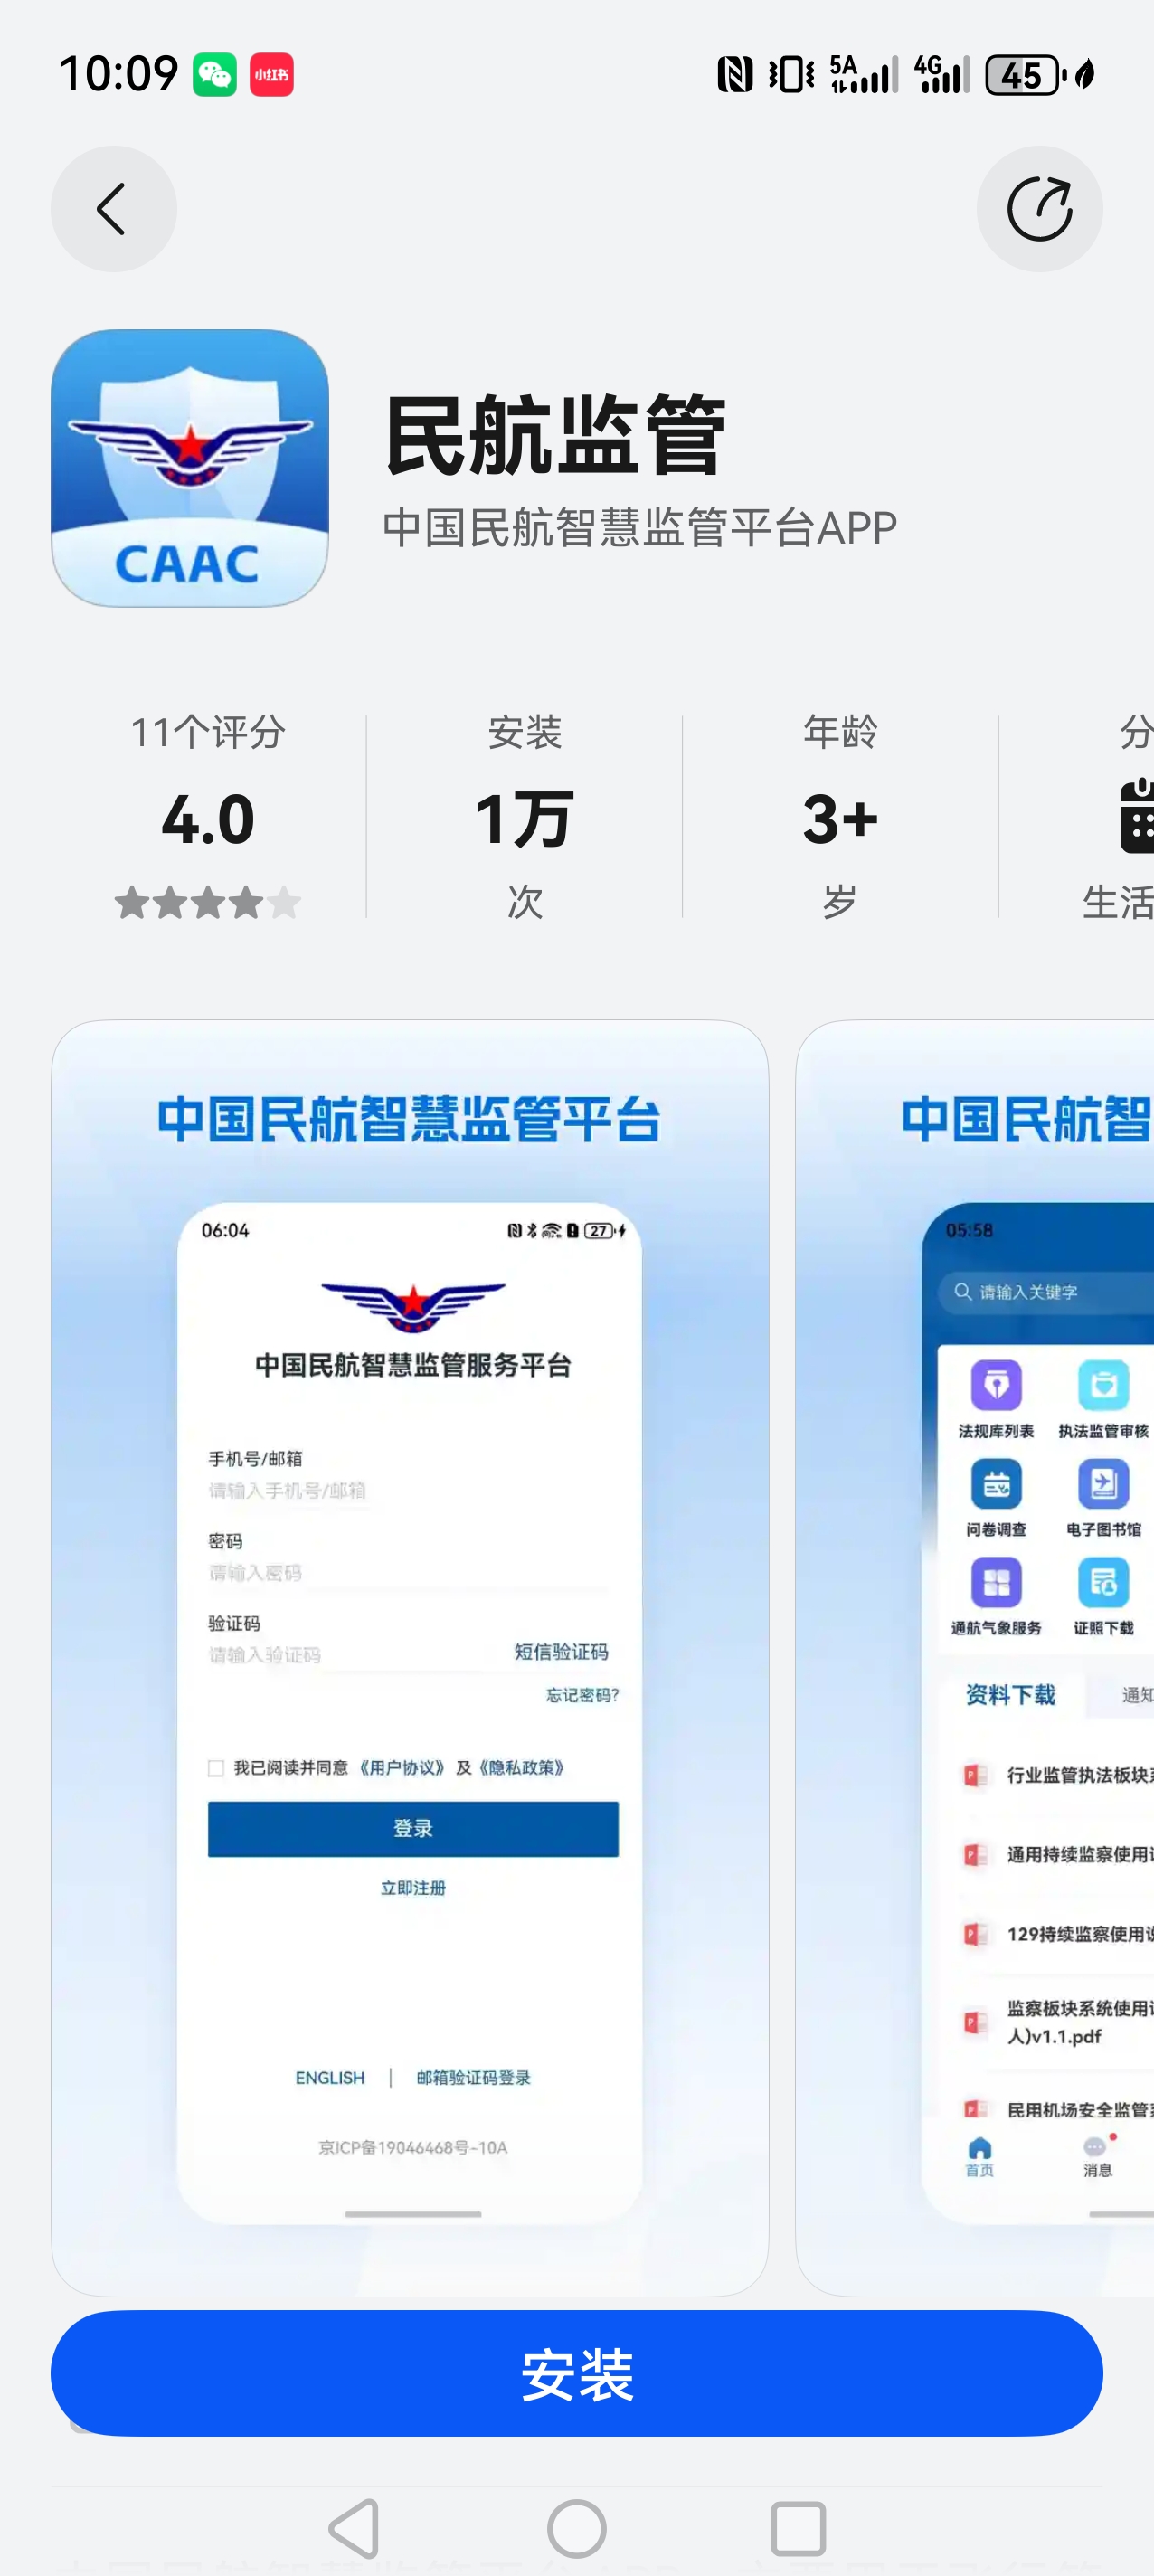
4.1 APP Download
| Device Type | Minimum Version | Recommended Version |
|---|---|---|
| Android | Android 10 (API 29) | Android 11-14 |
| iOS/iPadOS | iOS 14 | iOS 15-18 |
| HarmonyOS Pure | HarmonyOS 5.0.0 | HarmonyOS 5.0.0 and above |
Android clients

iOS Client
Search for "民航监管" (CAAC Supervision) in the App Store.
Client for HarmonyOS 5.0.0 or later
Search for "民航监管" (CAAC Supervision) in the App Store.
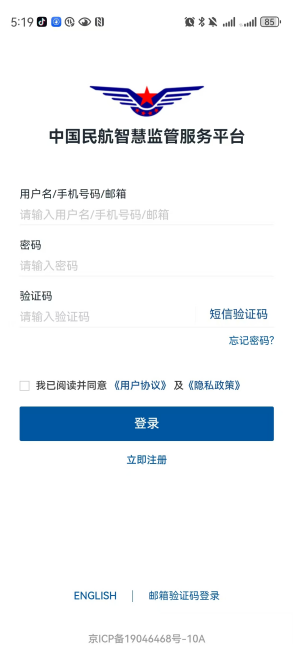
4.2 Login Method
Phone Number + Password + SMS Verification Code
After successful login, please note that due to different user permissions, the main page content displayed may vary slightly. Please be aware.
5. Administrative Counterparty (Legal Person) Registration
5.0 Training Video
1.Administrative Counterparty Registration Process
5.1 Operating Environment and System Access
5.1.1 Operating Environment
Windows OS, Yinhe Kylin, Tongxin, etc.
Chrome browser is recommended.
Resolution 1920*1080 or above is recommended.
5.2 Administrative Counterparty Registration
- Visit https://sop.caac.gov.cn/acc-web/#/register to register
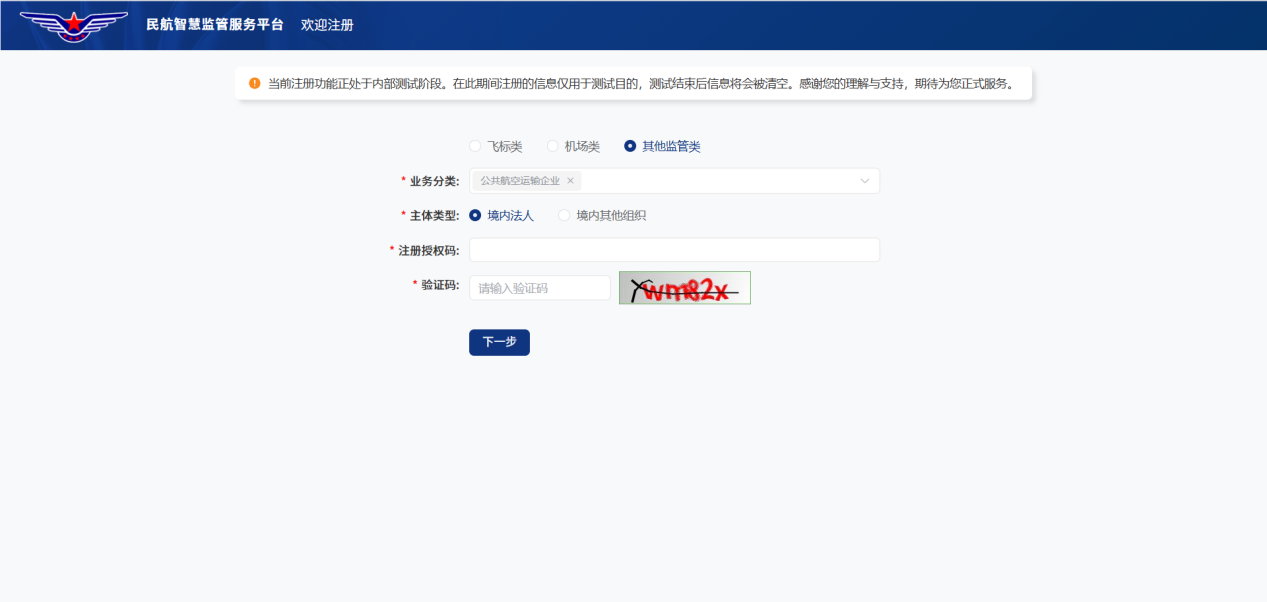
- Select the corresponding business category and business subject. Industry users should enter the business authorization code obtained from the administration bureau, enter the registration captcha, and click 【Next】 to enter the detailed registration page
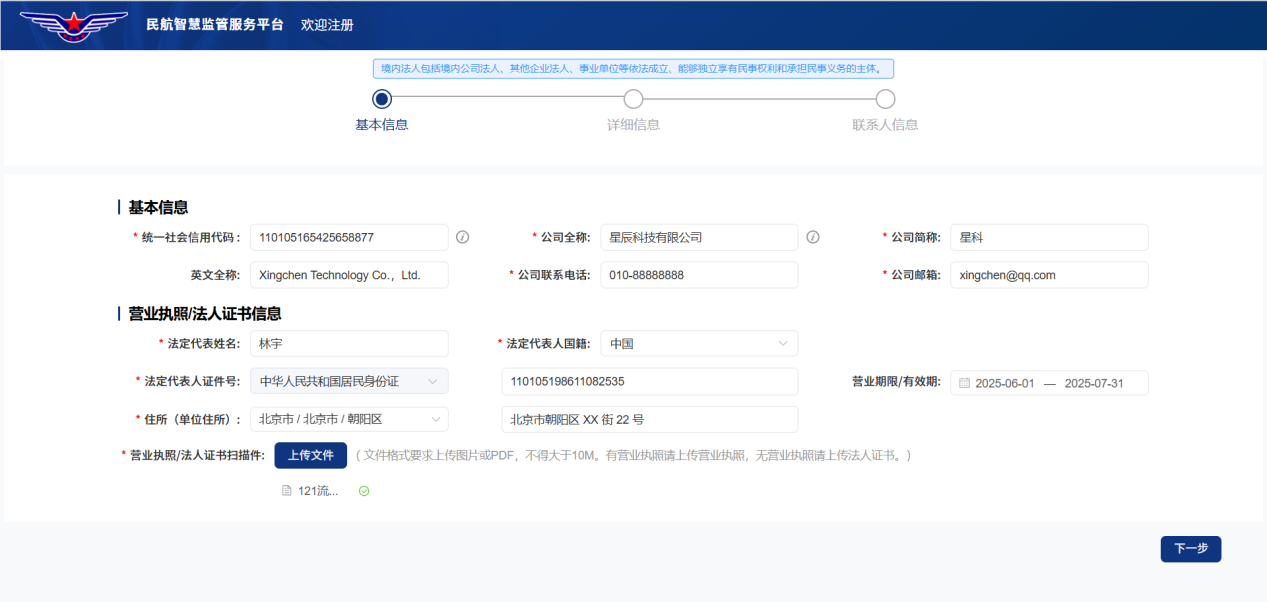
- Administrative counterparty registration consists of three steps: "Basic Information - Detailed Information - Contact Information". When filling in basic information, please correctly fill in according to the company's registered license information, ensure it is correct, and click 【Next】 to complete the basic information.
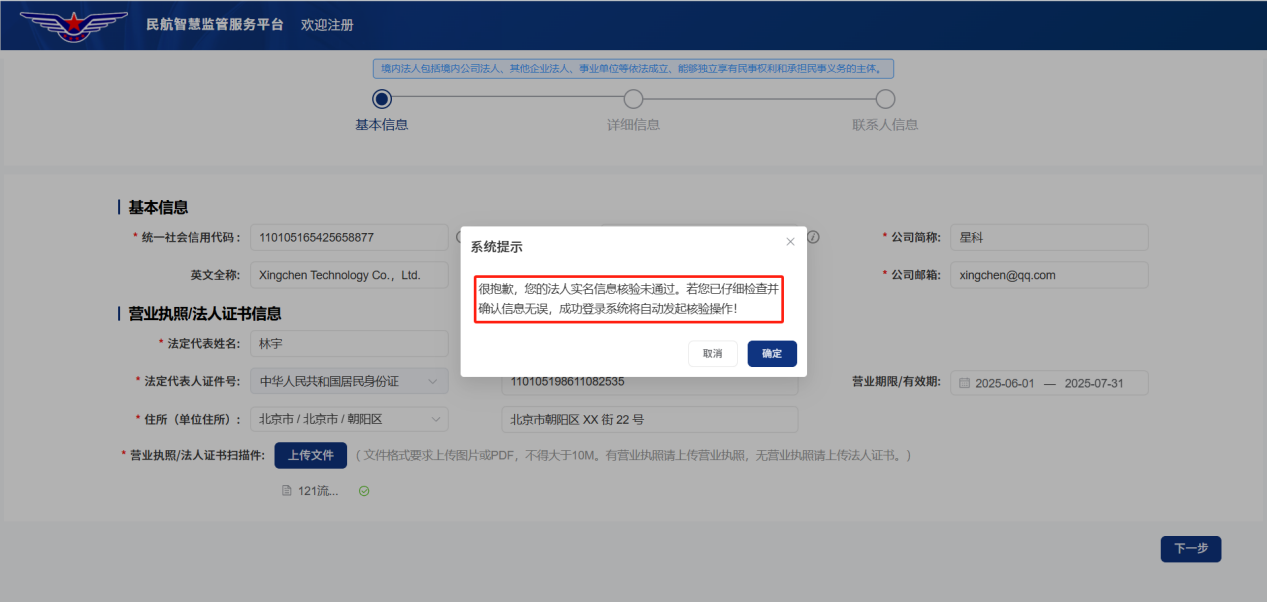
- When clicking "Next", the system will verify the legal person's information. If the system prompts "Your legal person real-name verification failed", it may be due to incorrect information or delay in real-name database synchronization. Please first verify if the legal person name, Unified Social Credit Code and other key information are accurate. If confirmed to be correct, click 【OK】 to complete registration, and the system will automatically re-verify later; if there is an error, please modify and resubmit. After registration, if verification still fails, you can go to "Unit Information Management" module to manually update.
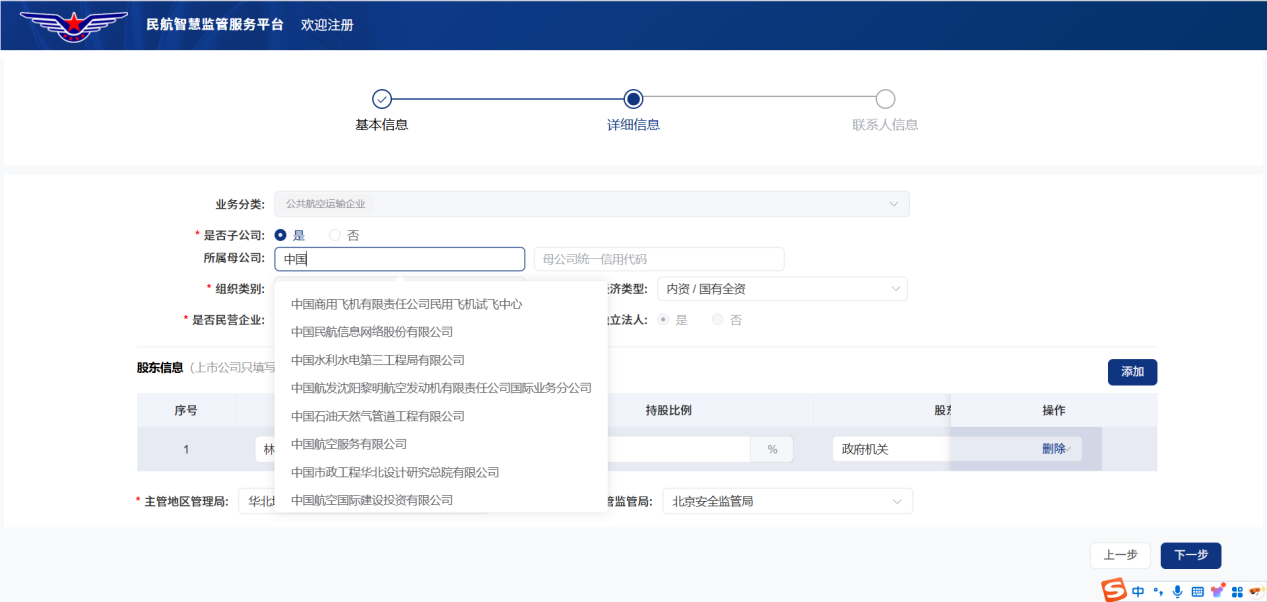
- On the detailed information page, please fill in the detailed information according to the company's actual situation. If the registered company is a subsidiary, check "Is Subsidiary" field, then enter the parent company's name. After entering the name, the system will automatically bring up matching company information. After selection, the system will automatically bring in the parent company's Unified Social Credit Code. If the parent company is a non-civil aviation company, you can manually enter relevant company information. After filling in all information, click 【Next】 button.
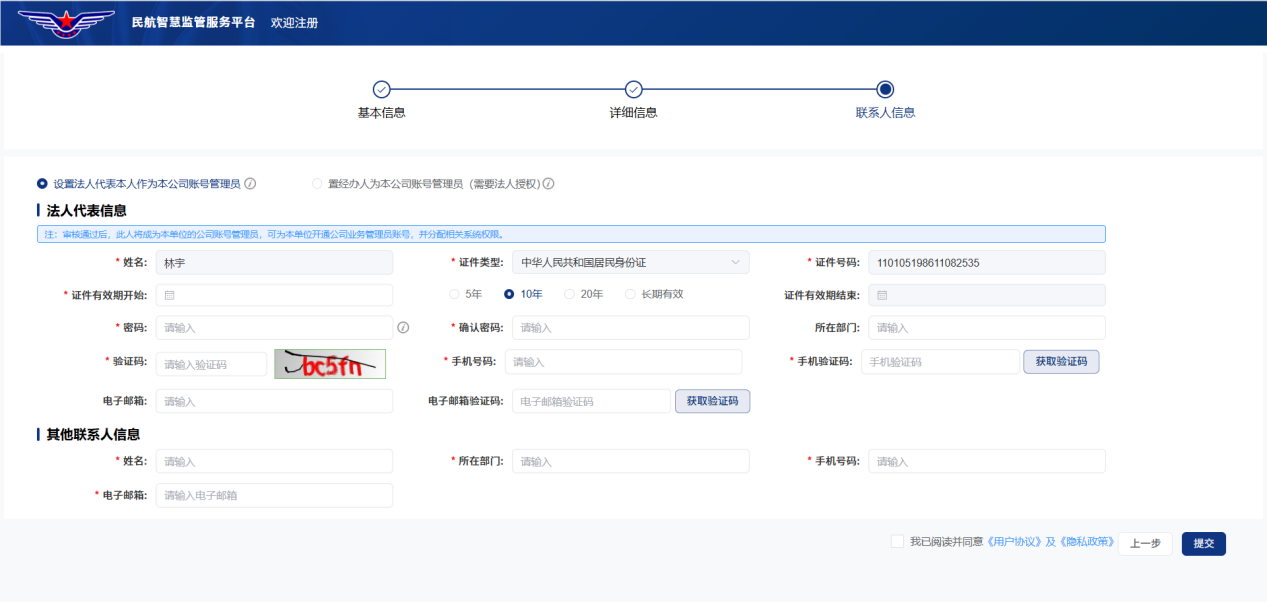
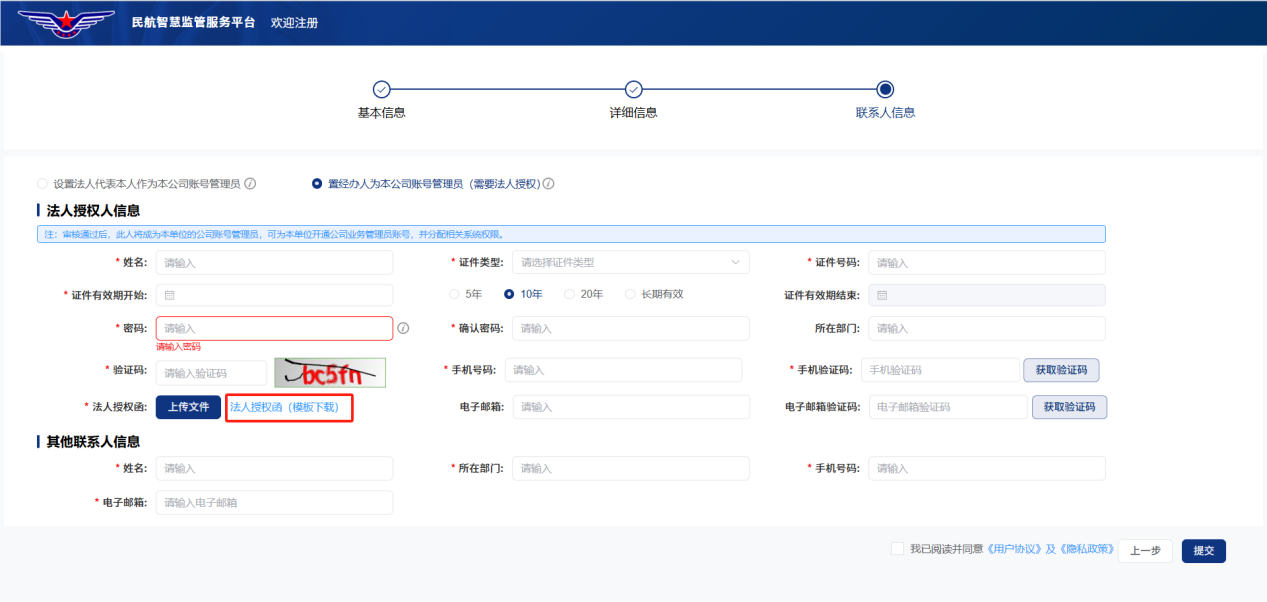
- After entering the contact information page, this page is used to confirm the company system administrator settings. Administrative counterparties can choose one of the following two methods:
- 1. Set the legal representative as the company's account administrator;
- 2. Set the authorized person as the company's account administrator (requires official seal authorization letter).
- If choosing the former, the system will directly complete the administrator registration with the legal person's information.
- If choosing the latter, you need to register the specified authorized person as the system administrator based on the legal authorization information. Please click "Legal Authorization Letter" below the page to download the template,
- After downloading the template, please have the legal entity provide the unit authorization letter with official seal, upload it to the "Legal Authorization Letter" field to complete the authorization operation. When all basic information is filled in, click the submit button and wait for administrator approval. After approval, the administrative counterparty can complete the registration.

5.3 Administrative Counterparty Center
The Administrative Counterparty Center provides functions such as organization account management, basic information management, internal registration invitation codes, and new business applications. Users are divided into three types: Unit Administrator, Business Administrator, and Operator. Unit Administrator has the highest authority and can create Business Administrators and Operators; Business Administrator can create Operators within their business scope; Operators can only operate specific business, with no access to the Administrative Counterparty Center. User creation supports two methods: Administrator can directly create accounts, or generate Business Administrators and Operators through invitation registration.
6. Frequently Asked Questions
6.1 Login Without Permissions - Try Clearing Cache
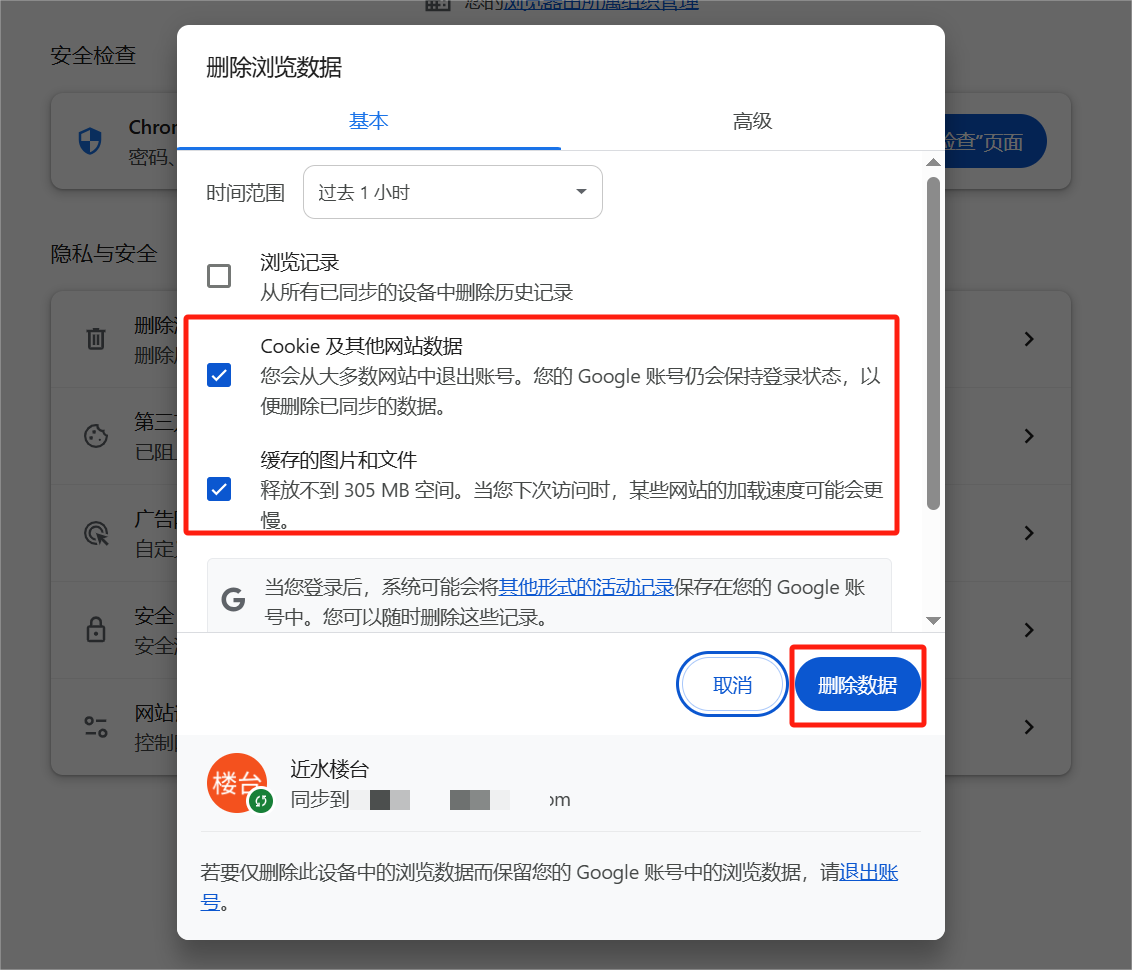
If after logging in you find only one homepage button without other system permissions, you need to clear the cache, as shown below:

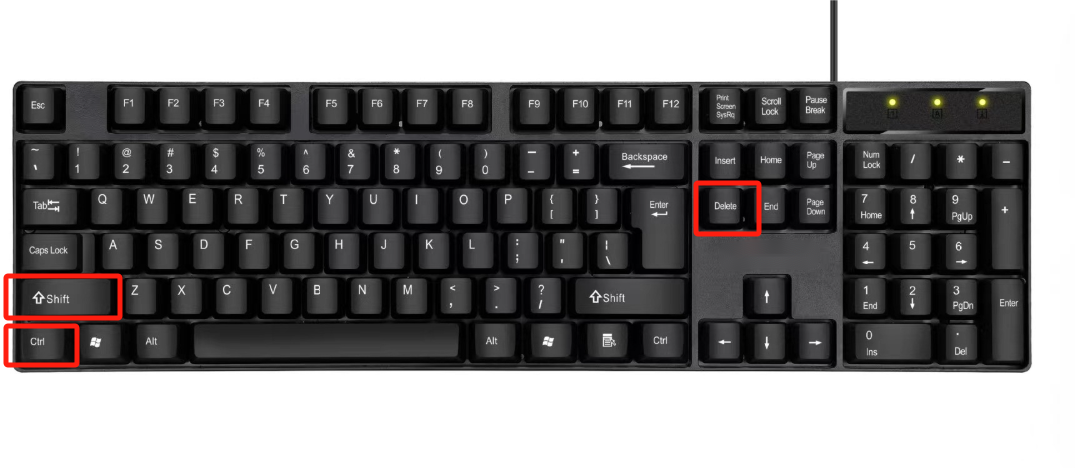
Please try to clear cache. Press Ctrl+Shift+delete simultaneously, as shown in the red box below:
After clicking, a page as shown below will pop up. Click 【Delete Data】 to complete the cache clearing
6.2 Rules for Determining Business Administrators on Administrative Counterparty Side
Users are divided into three types: Unit Administrator, Business Administrator, and Operator. Unit Administrator is the administrator set during registration, has the highest authority, and can create Business Administrators and Operators; Business Administrator can create subordinate Business Administrators and Operators within their business scope; Operators can only operate specific business, with no access to Administrative Counterparty Center. The new system sets the following business administrator rules:
SES Users
The system defaults the company contact filled in during original SES registration as the system business administrator. Please use the business administrator phone number filled in during registration to log in.
FSOP121 Users
Business administrator is the civil aviation affairs contact filled in item A0013a of the Operation Specifications in the original 121 system
FSOP142 Users
Business administrator is the "Standards Supervisor" filled in item C002 of the Operation Specifications in the original 142 system
FSOP135, 136, 141, 145, 147 Users
Business administrator is the administrator information filled in for the online collection forms published by the bureau for each company
Airport Users
Business administrator is the user from the original airport ASOP system